How to get the next relevant traffic light with IPGRoad API
Question
This FAQ entry focuses on the usage of our IPGRoad API and how one can use the documented functions under CarMaker Main GUI > Help > Additional Documents > IPGRoad API Reference.
A good understanding of C-Code generally, the C-Code Interface of CarMaker and the compilation process for CarMaker are required.
One would like to know, which traffic light will be the next relevant on the considered vehicle route.
The following pictures should describe two possible scenarios for such an use-case:
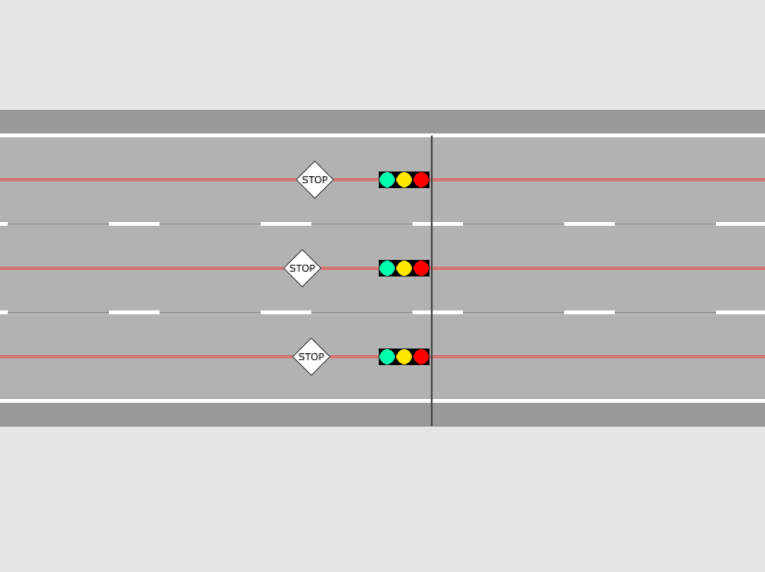
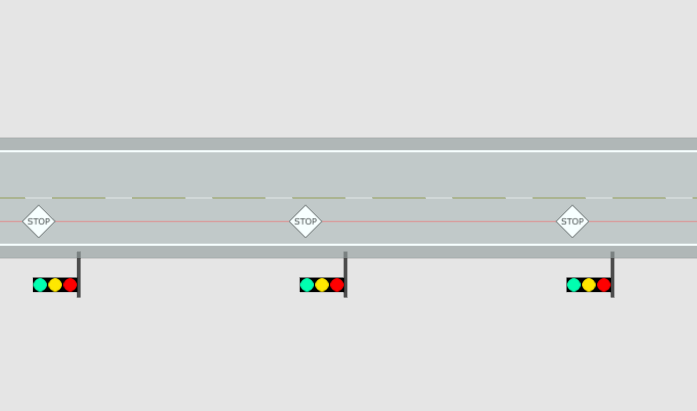
In the above left picture, there are 3 parallel lanes and routes, traffic lights and there associated stop markers by the traffic light controller defined. The right picture describes a scenario where 3 traffic lights are ordered consecutively on one lane.
Open questions could be: Which one of them will be the next to be considered traffic light, how far is it away and which state does it have? This should be solved by using the IPGRoad API and the provided CarMaker C-Code Interface. All code will be written to the User.c file, which is located in the /src folder of the corresponding project. As an addition to the main topics, this will be implemented and debugged with Microsoft Visual Studio.
If you would like to know, how you can debug a CarMaker application with Microsoft Visual Studio, please have a look on the FAQ entry by the following link: Debugging CarMaker with Visual Studio
Solution
Initialisation:
First of all we have to initialize the required structs, which are stored and described in the header file "road.h".
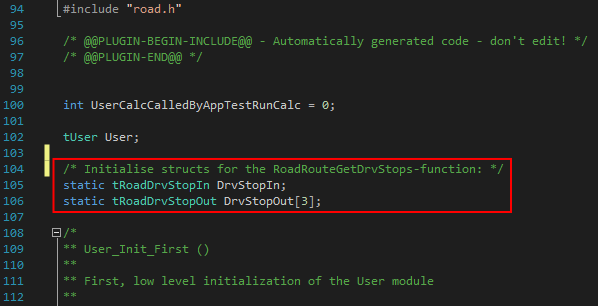
The structs are required for the function "RoadRouteGetDrvStops". For this the DrvStopIn-struct contains the input parameters and the DrvStopOut-struct the results of the function. The content of the structs is described in the IPGRoad API documentation or in the "road.h" header file. Please have a look on it.
The function "RoadRouteGetDrvStops" will then pass in the DrvStopOut-struct the objectID of the stop marker and the associated traffic light controller for the required route. The output value of the function corresponds to the number of detected traffic lights and can be at most the value 3, since with the help of this function at most the next three traffic lights can be detected. Therefore, an array of 3 DrvStopOut constructs is also formed during initialization. If all traffic lights of a route of the ego vehicle would be interesting, you would have to use the function "RoadRouteGetAllDrvStops".
Code implementation:
The next figure describes the code we have to add to the User_Calc function of the User.c file:
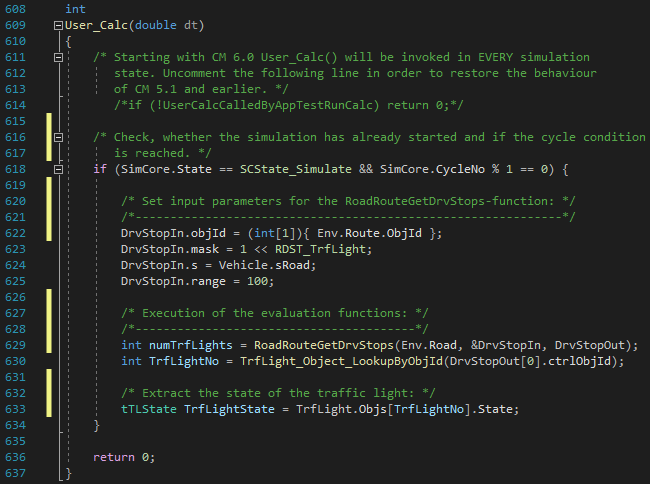
First we check with the if-condition whether the TestRun was started, because User_Calc will be executed even if no simulation was started. We only have to execute these functions while driving/simulating. With the AND operation and the second condition using the module division, the function will be executed every x main cycles (here: with the value 1 the functions of the IPGRoad API inside User_Calc are executed every main cycle).
Input Parameters:
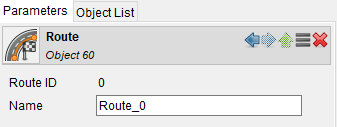
Next we have to define the input parameters of the DrvStopIn construct. The passed DrvStopIn.objId describes the object ID of the route. You can take this e.g. from the Scenario Editor or automatically from the "Environment.h" header file via the global Struct and its fields "Env.Route.ObjId".
The DrvStopIn.mask describes which specific stop markers you are interested in and filters out accordingly. For this purpose a binary value must be passed, e.g. for Traffic Light stop markers the binary number sequence: 0 0 1 0 0. RDST_TrfLight is an enum and substitutes the value 2. With the left shift operator you consequently create the binary number sequence mentioned above. You can also select other stop markers. You can find out which stop markers are available for filtering using the IPGRoad API documentation under the search term "enum tRoadDrvStopType".
The range of the area to be examined DrvStopIn.range is shifted along the route with the offset DrvStopIn.s. In our case shown, we defined the s coordinate of the vehicle along the route for the offset. For the range, we defined an arbitrary value of 100. This gives us the instantaneous distance relative to the ego vehicle to the next three detected traffic lights that are within 100 m of the vehicle while the simulation is running. You could also specify a fixed value here, but this would always give you the same distance to the first three detected traffic lights.
Executing the evaluation functions:
Finally, we apply the function "RoadRouteGetDrvStops" and get the number of detected stop markers of the corresponding traffic lights, which is stored in the variable "int numTrfLight" and additionally the objectID of the respective stop marker and traffic light controller in the output structure DrvStopOut. An example of the output can be seen in the following figure:
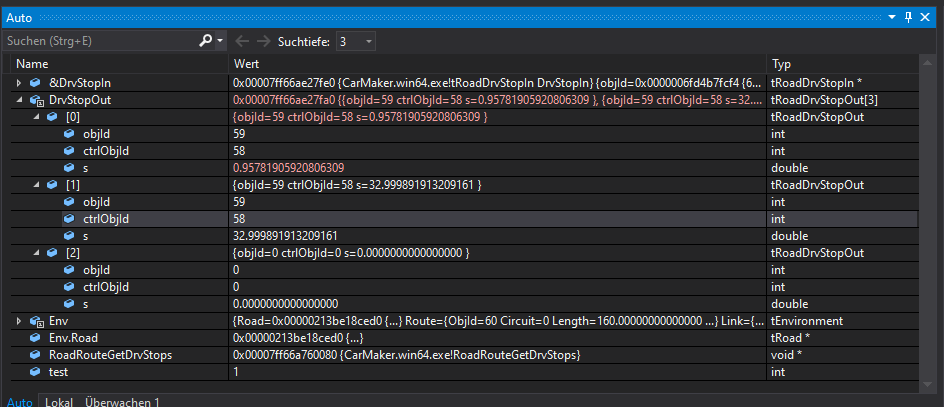
Next we pass the Traffic Light Controller ID of the first detected traffic light ("DrvStopOut[0].ctrlObjId") to the function "TrfLight_Object_LookupByObjId". The latter function comes from the "TrfLight.h" header file. The return value "int TrfLightNo" now contains the position of the corresponding traffic light in the array "TrfLight.Objs".
Extracting the state of the traffic light:
Finally we pass this integer to the mentioned array with "TrfLight.Objs[TrfLightNo].State" and get as a return value the state of the traffic light (green, yellow, red). Further information, like the position of the graphic object of the traffic light in the global coordinate system Fr0, can be taken from the TrfLight-struct:
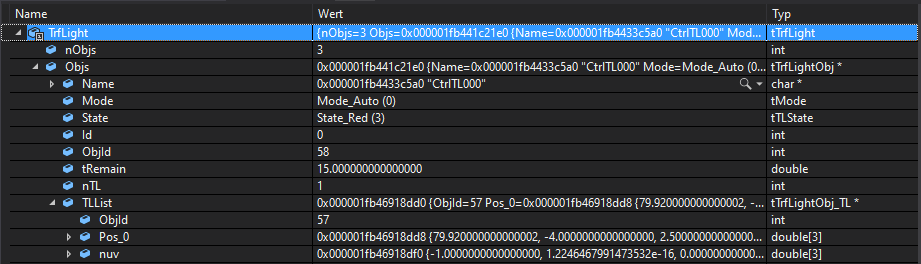
These members of the struct are also described in the "TrfLight.h" header file.
- Date: 05.02.2021
- Product: CarMaker
- Version: 9.0
- Component: C-Code Interface
- Language: English
Tags
IPGRoad APIuse-case example
Traffic Light
Visual Studio