How to set up the GPU Coding Interface with Visual Studio Code
Question
We introduced our new GPU Coding Interface feature starting with CarMaker R11, which is an open programmable user interface for the GPU based 'Raw Signal Interfaces (RSIs)'. It was developed to enable any easy integration of custom signal processing models into the CarMaker simulation. For this purpose, the internal signal processing of CarMaker can be deactivated for each supported RSI and replaced by an own implementation. It allows to provide manufacturer specific signal processing algorithms to customers, suppliers and other users as a binary runtime library to protect their intellectual property.
To create your own signal processing functions and runtime libraries, one has to do several steps beforehand. This FAQ shall provide you a basic understanding and act as a quick start guide to get in touch with the GPU Coding Interface and the three existing examples. It is mostly meant for beginners with these tools or such setups. Note that this FAQ focusses on creating a system environment with Visual Studio Code, which is currently the most popular IDE available for free. We are providing a specific GPU Coding Interface configuration solution for Visual Studio Code in this example, which is just the same configurations file from the CarMaker installation example, but with already defined paths and a specific .vscode configuration folder. The required "GPUCodingIF_VSCode_Example.zip" is attached to this FAQ and can be found at the bottom of this page. Furthermore you will need the following tools and versions compiled and/or installed on your operating system for this exemplary project:
- Microsoft Visual Studio Code IDE
- Microsoft Visual Studio IDE (only for Windows - can be Community, Professional or Enterprise)
- Nvidia CUDA Toolkit >= 11.2
- GLFW 3.3.8 (optional)
- GLEW 2.2.0 (optional)
You can also use other versions for GLEW and GLFW, but the CUDA Toolkit has to be greater than or equal to version 11.2. GLEW and GLFW packages are only required for the 3rd example. If you don't want to use these packages, we will explain how to disable the packages (and consequently example no. 3) in order to run only example 1 and 2. All steps will be explained for the operating systems Windows and Linux independently. Note: Visual Studio Community IDE is required when using Visual Studio Code on Windows. More informations on this in the following "Solution" section. A brief table of contents and which topics you should expect in the "Solution" section:
- How to set up GPU Coding Interface for Windows
- How to set up GPU Coding Interface for Linux
- Run the available GPU Coding Interface examples
- Deactivating the 3rd example and usage of GLEW/GLFW packages
Solution
How to set up GPU Coding Interface for Windows:
Before you use the attached package, you have to prepare your system environment with the MSVC compiler, CMake and CUDA Toolkit. Whether you use Visual Studio Code or not is independent of the required installation of the Visual Studio IDE (Community, Professional or Enterprise). Currently the Nvidia CUDA Toolkit is installing a so called "Visual Studio integration" feature, which detects any installed Visual Studio instances and set's them up to be detected by e.g. CMake. Without having the Visual Studio IDE and instead having only Visual Studio Code + the Buildtools for Visual Studio 2022, CMake will not recognize the CUDA Toolkit and abort the Makefile build process with the message "no CUDA toolset found". Therefore the following steps have to be done in the exact same order:
- Download and install Microsoft Visual Studio IDE (Community, Professional or Enterprise). Here is an exemplary screenshot of the Visual Studio Installer and the current installed components:
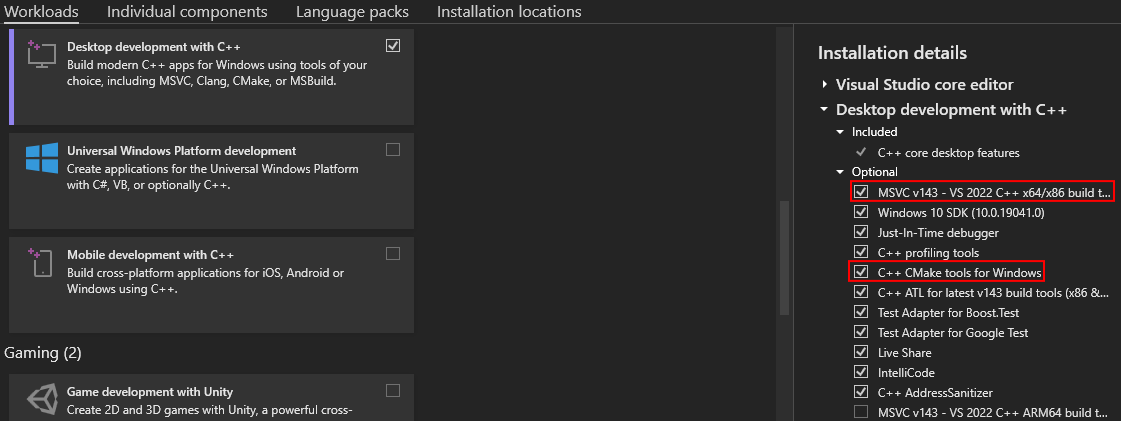
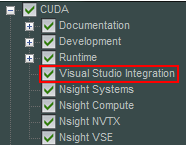
Select the apropriate MSVC compiler for your use case. In this example we installed the newest available one. Besides you should choose the "C++ CMake tools for Windows" to install cmake.exe for the following CMake build. - Download and install the Nvidia CUDA Toolkit. Take care of the following marked feature when installed via "Custom" installation method:
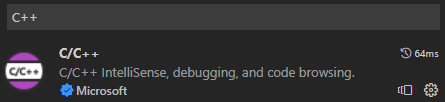
In case the installer was not able to find any installed Visual Studio instance, it will notify you. In such a case, you would probably have to reinstall the IDE and CUDA Toolkit. - Download and install Visual Studio Code (we used version June 2022 - 1.69.2). After the installation is done, you have to install the following Visual Studio Code extensions:

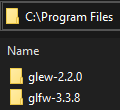
- Download and install GLEW and GLFW. You should place the folders "glew-2.2.0" and "glfw-3.3.8" in the following directory: "C:\Program Files" - which would require admin rights. In case of missing admin rights, you have to adapt the paths in the "CMakeToolchainWindows.cmake" file and place these folders, where you are allowed to do so (e.g. your user folder). Where and how to adapt the so called Toolchain file for Windows will be explained subsequently.
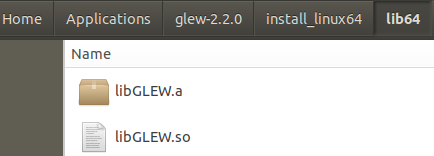
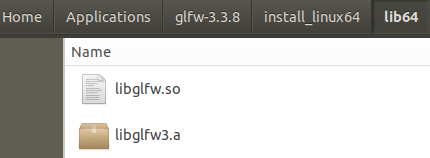
The libraries for each package have to be located in the following directories: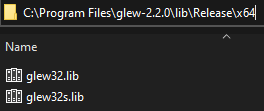
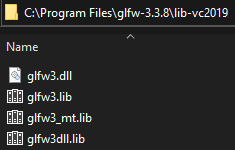
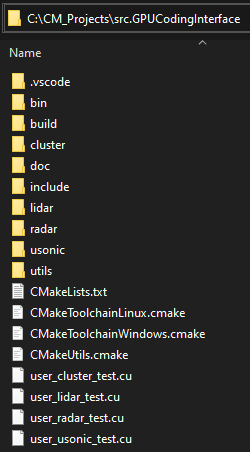
The packages can be downloaded as precompiled packages from the provided links above so you don't need to compile it by yourself. This is only valid for Windows but not for Linux, where you have to compile the packages by yourself. - First copy the exemplary GPU Coding Interface example folder "src.GPUCodingInterface" from the installation directory "C:\IPG\carmaker\win64-11.X.X\Examples\GPUCodingInterface" to "C:\CM_Projects". Now unzip the "GPUCodingIF_VSCode_Example.zip" and copy the folder "src.GPUCodingInterface" to the same directory: "C:\CM_Projects". You will be asked, if you want to replace the old files - confirm and replace the old files. As mentioned before, if you don't have admin rights, place them where you are allowed to do so. The paths can be adapted afterwards within the Toolchain file for Windows. Finally the data structure should look like the following:
- Open the folder "src.GPUCodingInterface" in Visual Studio Code. The content of that folder should look as follows:
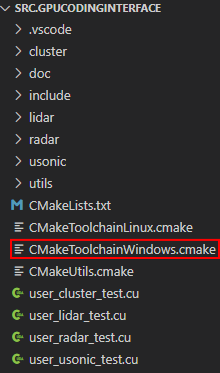
Open the Toolchain file "CMakeToolchainWindows.cmake". You should see the following: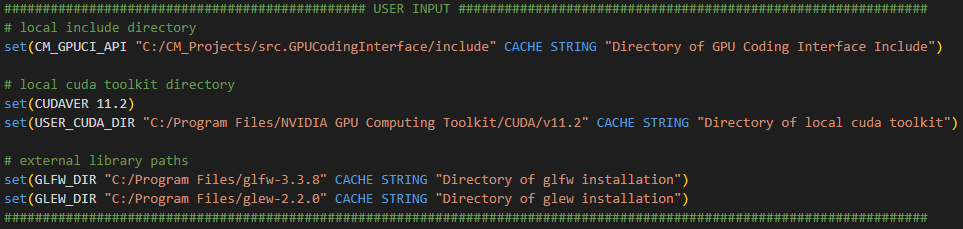
Here you can see the different paths you shall define. For this FAQ example we already have set the paths. As mentioned in the last two steps, you can change these paths however you want as long as you follow the same format rule (forward slashes and path in quotation marks). As soon as all the paths are correctly defined, we can prepare the next steps to configure the CMake project for the first time. - When opening Visual Studio Code the first time, you have to define a kit for the CMake projects. This is indicated by the bottom line of Visual Studio Code:

In the beginning you should see something like "No active kit". Click on this field and a list at the top should appear: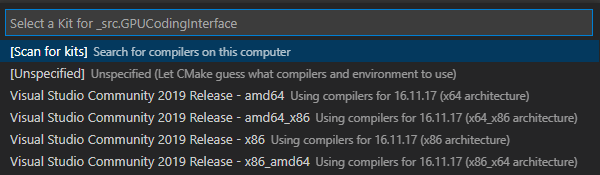
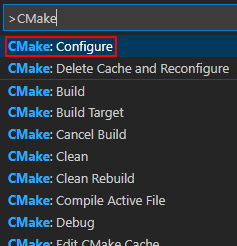
Select the apropriate kit for your use case. In this example we used the "Visual Studio Build Tools 2019 Release - amd64" toolkit. - Now start configuring the CMake project and building the Makefiles. As you might already know, CMake is a helpful tool for cross-compilation and building Makefiles independent of the operating system. To start creating the Makefiles, press the hotkey "Ctrl + Shift + P", write "CMake" and select the command "CMake: Configure" as shown in the following screenshot:
This will now start cmake.exe and in case everything was well defined and installed by the preceding steps, you should see the following output: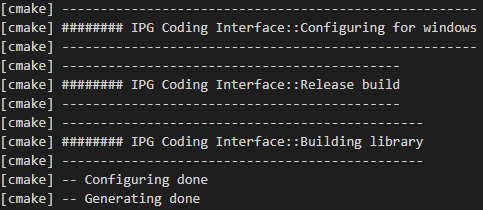
The cmake commands are all defined in the CMakeLists.txt, if you want to understand how the Makefiles are build with CMake. The "CMakeUtils.cmake" contains additional functions we are using in the CMakeLists.txt. In the last screenshot you have seen, that we are logging messages indicating that the Makefiles are configured for Windows, building a release version (non debug) and a runtime library. The Makefiles and so called CMake cache is located in the "build" folder, which was just generated. If you want to use other configurations (e.g. activating the Test Suite or Debug mode), you can select between 4 different variants. They are all available when clicking on the following field:
which opens the following available configurations displayed at the top of the window:
These variants are all defined under "\src.GPUCodingInterface\.vscode\cmake-variants.json". If you want to configure other variants, just adapt the cmake-variants.json file accordingly. This .json file and variants were specifically created for this example and are not part of the regular GPU Coding Interface example folder from the CarMaker installation. - After successfully creating the Makefiles, you can start building the runtime library by clicking on "Build":

This will generate the folder "bin\Release", which contains the Windows runtime library "user_rsi.dll". The runtime library can now be fully integrated in CarMaker, which is part of our 2nd example. By switching the configuration from "Release + OFF" to "Debug + ON" and building afterwards, you will create the folder "bin\Debug", which should now contain the executable "user_test.exe". This is part of our implemented Test Suite and demonstrates the 1st example. If you were able to build both of them, you have successfully set up the Visual Studio Code environment for our GPU Coding Interface on Windows.
How to set up GPU Coding Interface for Linux:
For Linux we are not depending on Visual Studio IDE and can set up our own environment independently. The compiler used here is GCC and NVCC for CUDA. In the following steps we will describe, how one can set up the Visual Studio Code environment for our GPU Coding Interface on Linux:
- Install the Nvidia CUDA Toolkit (at best you are installing it in the directory "/usr/local/"). You can also save it on another location, e.g. in your home folder, if you don't have sudo rights.
- Install Microsoft Visual Studio Code for Linux
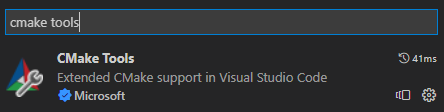
- Install the extensions "C/C++" and "CMake Tools" for Visual Studio Code:

- Install cmake and register the "bin" folder in the path variable. Check the cmake version which is executed with the command "cmake --version" if you have more than one cmake version installed on your system.
- Download and install GLEW and GLFW. We have placed the folders "glew-2.2.0" and "glfw-3.3.8" in the following directory: "/home/<User>/Applications/". The "<User>" is just a placeholder and should be exchanged by you in the Toolchain file for Linux. The GLEW and GLFW libraries usually have to be compiled by yourself. After compiling them, the libraries should be located in the following directories (which you most likely have to create by yourself):
- First copy the exemplary GPU Coding Interface example folder "src.GPUCodingInterface" from the installation directory "opt/ipg/carmaker/linux64-11.X.X/Examples/GPUCodingInterface" to "/CM_Projects/". Now unzip the "GPUCodingIF_VSCode_Example.zip" and copy the folder "src.GPUCodingInterface" to the same directory: "/CM_Projects/". You will be asked, if you want to replace the old files - confirm and replace the old files. If you don't have sudo rights, place them where you are allowed to do so. The paths can be adapted afterwards within the Toolchain file for Linux.
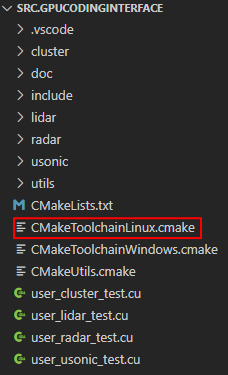
- Open the folder "src.GPUCodingInterface" in Visual Studio Code. The content of that folder should look as follows:
Open the Toolchain file "CMakeToolchainLinux.cmake". You should see the following: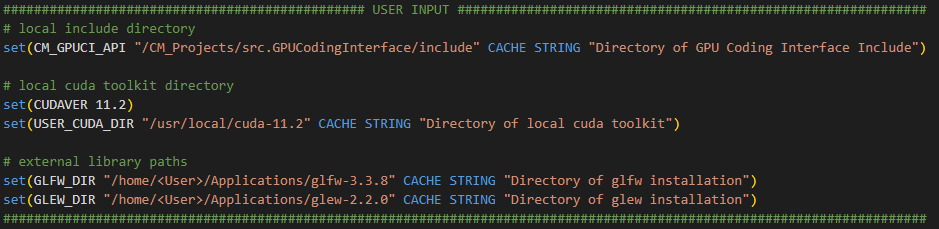
Here you can see the different paths you can define. For this FAQ example we already have set the paths. You can change these paths however you want as long as you follow the same format rule (forward slashes and path in quotation marks). Make sure to adapt the "<User>" entry for GLEW/GLFW packages to your Linux user name. As soon as all the paths are correctly defined, we can prepare the next steps to configure the CMake project for the first time. - When opening Visual Studio Code the first time, you have to define a kit for the CMake projects. This is indicated by the bottom line of Visual Studio Code:
In the beginning you should see something like "No active kit". Click on this field and a list at the top of the window should appear: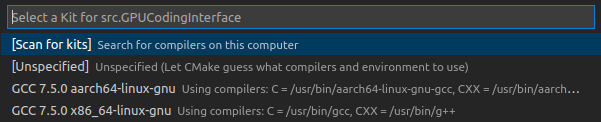
Select the apropriate kit for your use case. In this example we used the "GCC 7.5.0 x86_64-linux-gnu" toolkit. - Now start configuring the CMake project and building the Makefiles. As you might already know, CMake is a helpful tool for cross-compilation and building Makefiles independent of the operating system. To start creating the Makefiles, press the hotkey "Ctrl + Shift + P", write "CMake" and select the command "CMake: Configure" as shown in the following screenshot:
This will now start cmake.exe and in case everything was well defined and installed by the preceding steps, you should see the following output: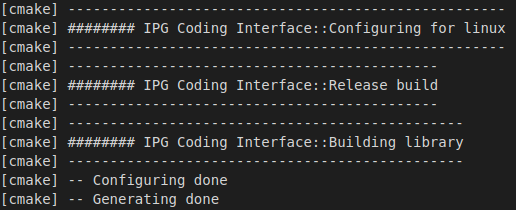
The cmake commands are all defined in the CMakeLists.txt, if you want to understand how the Makefiles are build with CMake. The "CMakeUtils.cmake" contains additional functions we are using in the CMakeLists.txt. In the last screenshot you could see, that we are logging messages indicating that the Makefiles are configured for Linux, building a release version (non debug) and a runtime library. The Makefiles and so called CMake cache is located in the "build" folder, which was just generated. If you want to use other configurations (e.g. activating the Test Suite or Debug mode), you can select between 4 different variants. They are all available when clicking on the following field:
which opens the following available configurations displayed at the top of the window:
These variants are all defined under "\src.GPUCodingInterface\.vscode\cmake-variants.json". If you want to configure other variants, just adapt the cmake-variants.json file accordingly. This .json file and variants were specifically created for this example and are not part of the regular GPU Coding Interface example folder from the CarMaker installation. - After successfully creating the Makefiles, you can start building the runtime library by clicking on "Build":

This will generate the folder "bin\Release", which contains the Linux runtime library "libuser_rsi.so". The runtime library can now be fully integrated in CarMaker, which is part of our 2nd example. By switching the configuration from "Release + OFF" to "Debug + ON" and building afterwards, you will create the folder "bin\Debug", which should now contain the executable "user_test.exe". This is part of our implemented Test Suite and demonstrates the 1st example. If you were able to build both of them, you have successfully set up the Visual Studio Code environment for our GPU Coding Interface on Linux.
In some specific cases one could get the error "redefinition of argument 'optimize' " on Linux. This happened on our Linux system, because we had two CUDA Toolkit installations located under "/usr/local" and executing nvcc from terminal leads to using the first one mentioned in the $PATH. The used nvcc was older (10.2) than required (11.2). CMake defined the optimization level "-O3" twice in the compile arguments and since the older nvcc version is not working with duplicate optimization level options, this error was triggered. In order to use one specific CUDA installation on your Linux system, you have to define the following option in the same line section: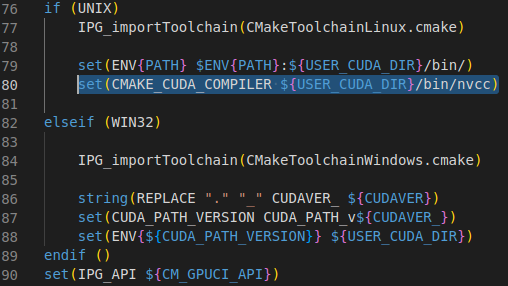
Run the available GPU Coding Interface examples:
- Now run the 1st example by starting the user_test.exe located in "\bin\Debug" in a command line window or PowerShell. The output in the shell should look like in the following:

Besides you should have noticed, that a lot of windows have appeared. They are part of our 3rd example and visualizes different exemplary figures to demonstrate the GLEW/GLFW packages inside the Test Suite executable. The log output is part of the 1st example and processes different predefined test steps in the CUDA files. It demonstrates, how one can test his algorithms implemented in the GPU Coding Interface before running it in the full CarMaker environment. - The 2nd example requires some more effort to be used. It is trying to integrate the runtime library in CarMaker and used with RadarRSI (and only for this). First of all, you have to copy the "user_rsi.dll" to an already created CarMaker R11 project folder under "Data\Sensor". Now start CarMaker and select the project. As an example, we will use our "RadarRSI_Motorway" product example, which can be found under CM Main GUI > Open > Product Examples > Examples > BasicFunctions > Sensors. Save the testrun and vehicle data set separately in your project folder (instead of using the read-only files from the CarMaker installation). Open now CM Main GUI > Parameters > Sensor Cluster and define the following expert parameters for the RadarRSI sensor:

If you have changed the name of the runtime library, make sure that you have correctly adapted the "GPUCoding.LibName" parameter. The exemplary screenshot above is also set up for Windows. For Linux you would have to use "libuser_rsi.so" by default. Now open the Vehicle Data Set, switch to Sensors > RARS_Param > Expert Parameters and set the following expert parameters: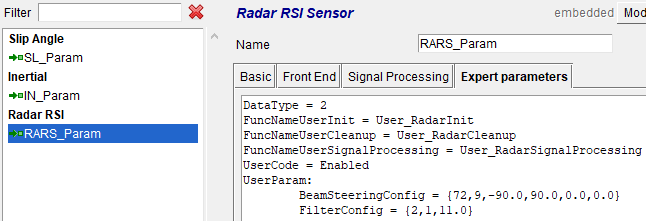
Make sure, that the indentation before "BeamSteeringConfig" and "FilterConfig" was done with a tabulator. Otherwise it will trigger the "Creating Antenna (-11)" error. With "UserCode" you can disable or enable your GPU Coding Interface functions. Open IPGMovie, turn on the visualization of RSI Sensor detections and start the simulation. You should see the following point cloud: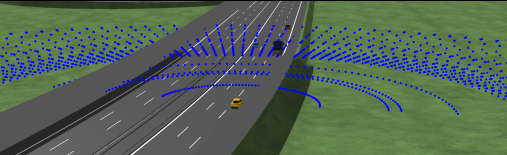
As you can see, no complex signal processing is happening now. We are just visualizing the detections of our preceding signal generation. This processing is integrated in our 2nd example, specifically for radar.
Deactivating the 3rd example and usage of GLEW/GLFW packages:
If you want to deactivate the 3rd example and do not intend to install and use the GLEW/GLFW packages, you have to comment out everything with GLEW, GLFW, usonic and utils/utils_opengl_draw in the following files:
- CMakeLists.txt
- user_cluster_init.cu
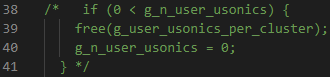
- user_cluster_cleanup.cu
Make sure, that you comment out each .cu and .h file of the mentioned strings. Specifically for the cluster CUDA files you have the comment out the following sections:
In "user_cluster_init.cu":

In "user_cluster_cleanup.cu":
- Date: 27.07.2022
- Product: CarMaker
- Version: 11.0
- Component: Sensor Models
- Language: English
Tags
GPUCoding
Interface
RSI