How to Cross-compile a Simulink Plugin in Windows for Linux
Question
Often, engineering teams have their entire developing workflow within the same OS environment (e.g. Windows). However, the final model needs to be able to run on different architectures.
When working within a Windows environment how can one Cross-compile a Simulink Plugin for a Linux architecture?
Solution
Introduction
These instructions show how to cross compile the example BodyCtrl_RTW.mdl plugin. The plugin compilation takes place in win64, but the final CM compilation happens in linux64. The examples use R2018a & CM10.2.2, but this can be any combination of CM10.2.2 or CM11.0.1 with a compatible Matlab version.
Make sure to backup any files that are been replaced in the installation directories. This can also be done by renaming the file (e.g. adding a .bak extension).
Please read the steps carefully. You can also skip some steps by downloading and adapting the resulting files.
Requirements
- Windows CM installation
- Windows Matlab installation
- Linux CM installation
- Modified cmplugutil.exe (provided in Required_files.zip)
Typical installation path for CM10.2.2
Linux: opt/ipg/carmaker/linux64-10.2.
Windows: C:/IPG/carmaker/win64-10.2.2
Step by step solution
In Windows
Step 1:
Copy necessary files from the Linux installation to the Windows installation:
- include/MakeDefs.linux64
- Matlab/R2018a/CarMaker_unix-linux64.tmf
- Matlab R2018a /libmatsupp-linux64.a
Step 2:
Add the modified cmplugutil.exe that accepts "-a linux64" to the Windows installation:
- copy cmplugutil.exe.CM10.2.2 from Required_files.zip
- paste it in bin/cmplugutil.exe.CM10.2.2
- rename it to cmplugutil.exe
Step 3:
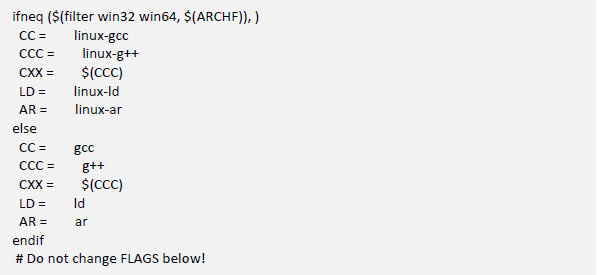
Adapt MakeDefs.linux64:
- Change installation directory and architecture

- Define cross compilation toolchain for win architecture (in section “### compiler and linker options”)
Step 4:
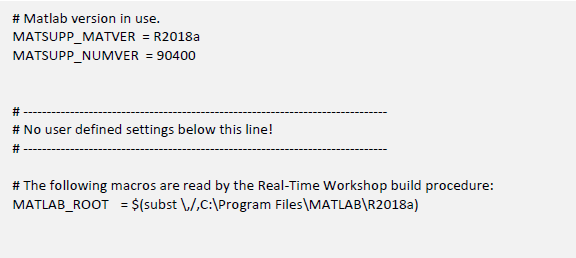
Adapt CarMaker_unix-linux64.tmf:
- Change installation directory to Windows


- Resulting Files: Steps_1to4.zip (note that the folder tree structure is included)
Step 5:
Create a new Project folder (with BodyCtrl_RTW.mdl):
- Open CM-GUI
- set path to Project Folder (e.g. in C:\CM_Projects\CM10)
- Select components:
- Source / Build Environment
- Simulink Coder (RTW) Examples
Step 6:
Build Plugin from BodyCtrl_RTW.mdl with Simulink Coder
- In Matlab:
- Navigate to Project Folder\src (e.g. in C:\CM_Projects\CM10\src)
- Run "cmenv.m"
- Open "BodyCtrl_RTW.mdl"
- If a new model is created, select target architecture: linux64
- In Simulink:
- Go to Model Settings > Code Generation > Template makefile:
- Set to CarMaker_unix-linux64.tmf
- Go to Model Settings > Code Generation > CarMaker:
- Deselect “Automatic ‘make’ in the project source directory” (this is done in step 10 in linux)
- Build (ctrl +B)
- Go to Model Settings > Code Generation > Template makefile:
- Resulting Files: Steps_1to6.zip
In Linux
Step 7:
Create a new Project folder:
- set path to Project Folder (e.g. home/CM_Projects/CM10)
- Select component:
Source / Build Enviroment
Step 8:
Copy plugin components from Project Folder/src in windows to linux:
- libBodyCtrl_RTW_linux64.a
- BodyCtrl_RTW_CarMaker_rtw/BodyCtrl_RTW.mk
- BodyCtrl_RTW_CarMaker_rtw/BodyCtrl_RTW_wrap.h
Step 9:
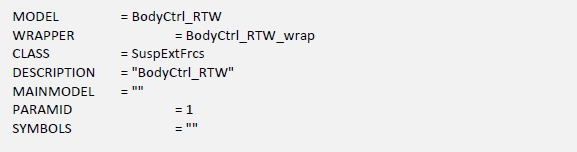
Adapt the Plugin make file (BodyCtrl_RTW.mk):
- In BodyCtrl_RTW.mk change the path for Linux

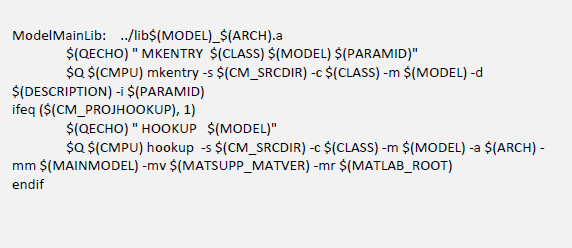
- In BodyCtrl_RTW.mk delete everything else in the .mk file except for:

- Resulting Files: Steps_1to9.zip
Step 10:
Perform a rebuild of the plugin:
- Open terminal and run the commands

Step 11:
Compile the .linux64 executable that includes the plugin:
- In the previous terminal run the commands

- Date: 22.09.2022
- Product: CarMaker
- Version: 10.2
- Component: Simulink
- Language: English
Tags
Cross-compileSimulink Plugin